We’ve all been told countless times of the importance of making a tension square before we knit a garment. Tension is very important if the finished garment is to turn out to be the correct size. However, there is a little more to it than just knitting a little square.
How to Knit a Tension Square
The pattern usually tells you the exact number of stitches and rows over a given measurement usually 10 cm or 4 inches that the designer obtained when making the original garment. (It doesn’t matter if you work in centimetres or inches as long as you are consistent). Before you knit your garment, knit a sample at least 10 cm square using the recommended yarn or one which is very similar. Leave the sample of knitting to rest for several hours and if it needs to be pressed or washed to remove oil this must als be done before any measurements are taken.
When the time has elapsed, hold a ruler across the square and place pins precisely 10 cm apart, both lengthwise and widthwise, making a 10 cm square. If there are too many stitches in the sample, then the tension is too tight, if too few stitches then the tension is too loose. The same applies for the rows. So, in order to get the correct tension use a higher or lower tension on your machine. This may happen because the designer used a different make of machine or perhaps you are using a different yarn.
If you are measuring tension on a chunky machine you may find it easier to use a larger square than 10 cm to measure since you will get far less stitches and rows to measure than when using a standard or fine gauge machine.
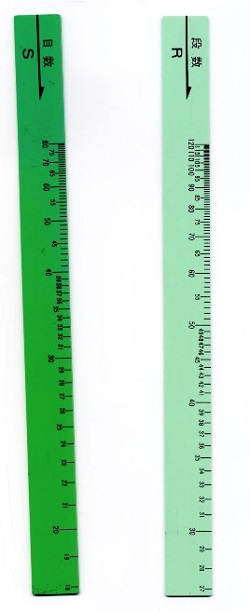
Although the green and blue rulers were designed with machine knitters in mind, there is no reason why a hand knitter could not use them.
The Green Ruler
To make things easier, Knitmaster have invented green ruler and its friend the blue ruler for chunky machines. Although these ruler were designed for Knitmaster machines, they can be used on any make of machine.
When introduced to this little green wonder, I asked lots of questions. The explanation went like this
- Cast on 70 stitches.
- Knit 10 rows in main yarn.
- Knit 2 rows in contrast yarn.
- Join in main yarn, and using the correct tension for the yarn, knit 30 rows in pattern.
- Mark the 21st stitch either side of centre 0 with a contrast piece of yarn.
- Knit another 30 rows in pattern. This is 60 rows in all.
- Knit 2 rows in contrast yarn.
- Knit 10 rows in main yarn.
- Cast off and remove from machine.
- Take a note of the yarn, tension dial number and pattern used in this tension square. (You can mark the stitch dial number on your tension square by making the correct number of holes before removing your knitting from the machine i.e. transfer one
stitch onto the adjacent needle the correct number of times, bring empty needles into working position and knit several rows.) - Allow the tension square to “rest”; an hour for acrylic and overnight for natural yarns such as wool or cotton. It maybe necessary to wash the tension square or even steam it if this is going to affect the tension.
- When the tension square has been rested, measure it using the green
ruler. Use the ruler with the ‘S’ side up. Place the arrow end of the ruler inside the left stitch in contrast yarn. Measure to the inside of the right hand contrast stitch. The number at this point on the ruler indicates how many stitches are required to knit 10 cm. The ruler should be used from the left edge where there is an arrow. Now, for the rows, use the ruler with the ‘R’ side up. Place the arrow end of the gauge
scale at the top of the tension square just below the rows knitted in contrast yarn. Measure inside the two pieces of spare yarn knitting. The number on the ruler indicates how many rows required to knit 10 centimetres. This alleviates the need to count stitches.
How does it work?
Then I asked the more difficult question. “How does it work?” After an awkward pause, the answer came. “It’s magic!” To me, all knitting is magic, but it still requires explanation.
After many hours of staring blankly at this little piece of plastic, and many searches through knitting books looking for an explanation, it seemed I would just have to work it out for myself.
It appeared to be based on some sort of ratio formula. That means it is mathematical. It is surprising how many knitters turn off when the work ‘maths’ or ‘arithmetic’ are mentioned. However, the figures are really not very difficult and they can explain a lot about knitting and making knitting far easier. So, please do read on.
The green ruler converts centimetres or inches to stitches and rows. When we say a tension square of 10 cm equals 27 stitches and 39 rows, we are actually converting the measurement of the knitting to either stitches or rows.
Therefore, if a piece of knitting measuring 10 cm equals 20 stitches, then 1 cm equals 2 stitches.
So, if 10 cm = 20 sts
then 1 cm = 2 sts
and
100 cm = 200 sts
50 cm = 100 sts
This can be converted into a formula. Thus, when you measure 10 cm how many stitches does that give you? e.g. 28 stitches equals 10 cm. Now, say you want to knit a sweater which is 50 cm wide.
So, if 10 cm = 28 sts
then 50 cm = (28 sts x 50 cm)/10 cm = 140 sts.
So, you would cast on 140 stitches.
Similarly, you want to work out the number of rows to knit up the back of the sweater to the armholes. Say this measures 30 cm. Your tension square gives you 40 rows to 10 cm.
So, if 10 cm = 40 rows
then 30 cm = (40 rows x 30 cm)/10 cm = 120 rows.
So, you would knit 120 rows.
Now, going back to our example, this gives us the formula:
(a x b)/c = d
where
a = the number of stitches or rows in a tension square
b = the number of centimetres or inches to be converted to stitches or rows
c = the number of centimetres or inches in a tension square (usually 10 cm or 4 inches)
d = the number of stitches or rows to be knitted
So, this is the ‘magic’ formula.
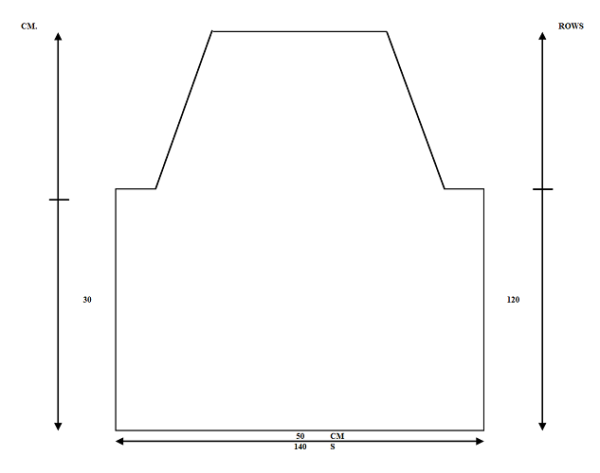
See, that wasn’t difficult was it? Just in case you are not sure, I have produced a diagram for this sweater working on a tension of 28 sts and 40 rows to 10 cm.
The Green Ruler Formula
So, how does this formula relate to the green ruler? Assume we will knit a tension square of 40 stitches and 60 rows and then measure these stitches and rows with the green ruler.
The green ruler formula is as follows
(a x b)/c = d
where
a = the number of stitches or rows in a tension square (in this example we will say 40 stitches or 60 rows)
b = the number of centimetres or inches in a tension square (usually 10 cm or 4 inches)
c = the length of the tension square (i.e. a variable value since every tension square will be a different size)
d = the number of stitches or rows as shown on the green ruler
Let us look at an example.
Knit a 60 row tension square and measure it.
The measurement is 10 cm or 60 rows.
(60 x 10)/10 = 60 rows
So, 20 cm is 30 rows.
(60 x 10)/20 = 30 rows
and 30 cm is 20 rows.
(60 x 10)/30 = 20 rows
that is:
(60 x 10)/variable = the number of rows required.
As you can see the formula for the green ruler is similar to the formula for converting centimetres to stitches or rows.
Using a Computer
It is possible to use a computer to help with your knitting in many ways. What you must be able to do is translate what you do (sometimes almost by instinct) into a recognisable mathematical formula. We have just done that by converting the use of the green ruler into a formula. Once you have a list of these formulas (or is it formulae!) it is a relatively simple matter to translate this (either yourself or by bribing a friendly computer buff) into computer language. Then the computer gets on with the tedious arithmetic whilst you go play with your knitting machine. I hope you have fun thinking about why you do things in knitting as well as how you do them.
