Archives

All posts for the month July, 2016

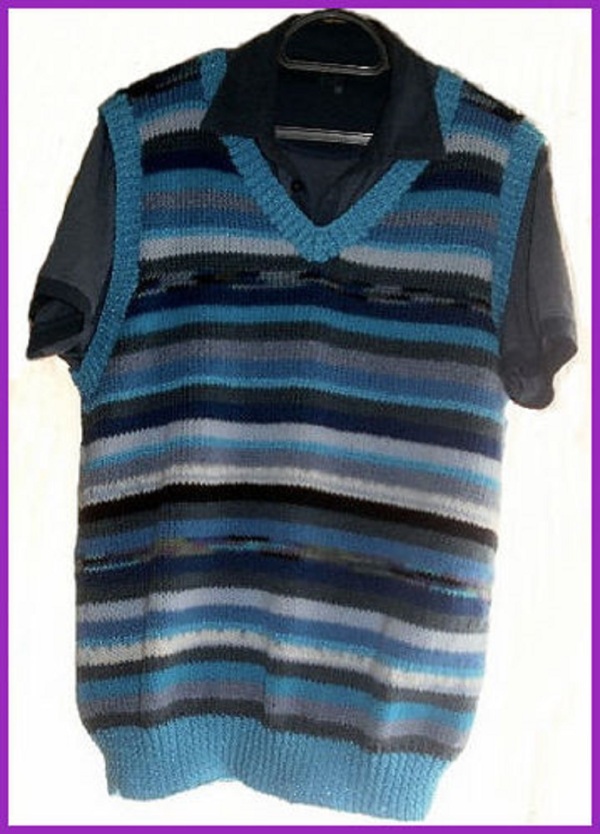
Free Pattern – Funky Tank Top

Published July 29, 2016 by estherknit

Funky Tank Top 14Machines

These instructions are written for KH260 Brother chunky gauge machines

Measurements

To fit chest size: 102 cm (40 inch)

Actual Measurements: 112 cm (44 inch)

Length from Back of Neck: 74 cm (29 inch)

Materials

Various double knitting yarns in shades of blue, 300 g

A pair of 3¾ mm knitting needles for ribs.

Main tension / gauge

17 sts and 23 rows to 10 cm (4 inches) measured over st.st. MT = 5.

Pattern notes

Twisted rib pattern

Cast on a number of stitches divisible by 2, plus 1.

1st row: K1, * k1 tbl, p1; repeat from * to 1ast 2 sts, k1 tbl, k1.

2nd row: K1 tbl, * p1, k1 tbl; repeat from * to end.

These two rows form the pattern and are repeated.

Random Stripe Pattern

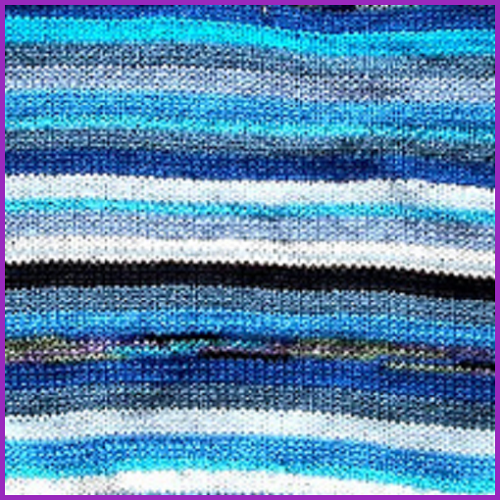
The sweater is knitted in a random stripe pattern using various yarns in shades of blue.

The ribs are knitted in one shade of blue.  Match the stripes for the back and front.

Funky Tank Top 7To knit Sweater

Back

COR. Using the open edge cast on method and WY cast on over 95 needles.

K 6 R. Break off yarn.

Join MY. Knit in random stripe pattern until RC = 78.

Shape armhole

Continue in random stripe pattern.

Cast off 4 sts at beg of next 2 rows.

Dec 1 st each end on next and every alt rows 11 times in total. 65 sts remain.

Knit until RC = 150.

Shoulders and neck

Remove centre 37 sts onto WY for back neck.

Remove 14 sts onto WY for right shoulder.

Remove 14 sts onto WY for left shoulder.

Back ribbing

Using 3¾ mm needles, pick up 94 sts from waste yarn at bottom of sweater.

Work 8 rows in twisted k1, p1 rib.

Cast off loosely.

Front

Work as for Back in random stripe pattern to armhole.

RC = 000

Remove all sts to LHS of ‘0’ onto WY.

Put centre st onto a stitch holder for v neck.

Shape armhole and neck

Continue in random stripe pattern as for back.

Cast off 4 sts at beg of next row.  K1R.

Work dec at armhole edge as for Back. (65 sts)

Remove sts on WY.  RC=000.

Work LHS as follows:

Place 32 sts back onto ndls for LHS.

Dec 1 st at neck edge every alt row 18 times in all.

Knit until  RC = 48.

Remove 14 sts for shoulder onto WY.

Work RHS as follows:

Place 32 sts back onto ndls for RHS.

Dec 1 st at neck edge every alt row 18 times in all.

Knit until  RC = 48.  Remove 14 sts for shoulder onto WY.

Front ribbing

Using 3¾ mm needles, pick up 94 sts from waste yarn at bottom of sweater.

Work 18 rows in twisted k1, p1 rib.   Cast off loosely.

Neckband ribbing

Sew left shoulder seam.

With right side facing, pick up 37 sts across back neck, 45 sts down right side of front neck,

1 st at V (mark this stitch with a safety pin or stitch market), 45 sts up left side of front

neck, (128 sts) Work 8 rows in twisted k1, p1 rib, decreasing 1 st either side of V st every alt

row.  Cast off loosely.

Armhole ribbing

Sew right shoulder and neckband seams.

Using 3¾ mm needles pick up 104 sts around armhole.

Work 8 rows in twisted k1, p1 rib.

Cast off loosely.

To make up / Finishing

Sew side seams. Weave in ends.

Funky Tank Top 6


Unravelling the Green Ruler

Published July 25, 2016 by estherknit

We’ve all been told countless times of the importance of making a tension square before we knit a garment. Tension is very important if the finished garment is to turn out to be the correct size. However, there is a little more to it than just knitting a little square.

How to Knit a Tension Square

The pattern usually tells you the exact number of stitches and rows over a given measurement usually 10 cm or 4 inches that the designer obtained when making the original garment. (It doesn’t matter if you work in centimetres or inches as long as you are consistent).  Before you knit your garment, knit a sample at least 10 cm square using the recommended yarn or one which is very similar. Leave the sample of knitting to rest for several hours and if it needs to be pressed or washed to remove oil this must als be done before any measurements are taken.

When the time has elapsed, hold a ruler across the square and place pins precisely 10 cm apart, both lengthwise and widthwise, making a 10 cm square. If there are too many stitches in the sample, then the tension is too tight, if too few stitches then the tension is too loose. The same applies for the rows. So, in order to get the correct tension use a higher or lower tension on your machine. This may happen because the designer used a different make of machine or perhaps you are using a different yarn.

If you are measuring tension on a chunky machine you may find it easier to use a larger square than 10 cm to measure since you will get far less stitches and rows to measure than when using a standard or fine gauge machine.

Although the green and blue rulers were designed with machine knitters in mind, there is no reason why a hand knitter could not use them.

The Green Ruler

To make things easier, Knitmaster have invented green ruler and its friend the blue ruler for chunky machines. Although these ruler were designed for Knitmaster machines, they can be used on any make of machine.
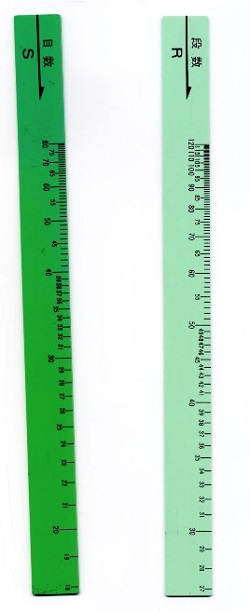
The Green Ruler

When introduced to this little green wonder, I asked lots of questions. The explanation went like this

  • Cast on 70 stitches.
  • Knit 10 rows in main yarn.
  • Knit 2 rows in contrast yarn.
  • Join in main yarn, and using the correct tension for the yarn, knit 30 rows in pattern.
  • Mark the 21st stitch either side of centre 0 with a contrast piece of yarn.
  • Knit another 30 rows in pattern. This is 60 rows in all.
  • Knit 2 rows in contrast yarn.
  • Knit 10 rows in main yarn.
  • Cast off and remove from machine.
  • Take a note of the yarn, tension dial number and pattern used in this tension square. (You can mark the stitch dial number on your tension square by making the correct number of holes before removing your knitting from the machine i.e. transfer one
    stitch onto the adjacent needle the correct number of times, bring empty needles into working position and knit several rows.)
  • Allow the tension square to “rest”; an hour for acrylic and overnight for natural yarns such as wool or cotton.  It maybe necessary to wash the tension square or even steam it if this is going to affect the tension.
  • When the tension square has been rested, measure it using the green
    ruler. Use the ruler with the ‘S’ side up. Place the arrow end of the ruler inside the left stitch in contrast yarn. Measure to the inside of the right hand contrast stitch. The number at this point on the ruler indicates how many stitches are required to knit 10 cm. The ruler should be used from the left edge where there is an arrow. Now, for the rows, use the ruler with the ‘R’ side up. Place the arrow end of the gauge
    scale at the top of the tension square just below the rows knitted in contrast yarn. Measure inside the two pieces of spare yarn knitting. The number on the ruler indicates how many rows required to knit 10 centimetres.  This alleviates the need to count stitches.

How does it work?

Then I asked the more difficult question. “How does it work?” After an awkward pause, the answer came. “It’s magic!” To me, all knitting is magic, but it still requires explanation.

After many hours of staring blankly at this little piece of plastic, and many searches through knitting books looking for an explanation, it seemed I would just have to work it out for myself.

It appeared to be based on some sort of ratio formula. That means it is mathematical. It is surprising how many knitters turn off when the work ‘maths’ or ‘arithmetic’ are mentioned. However, the figures are really not very difficult and they can explain a lot about knitting and making knitting far easier. So, please do read on.

The green ruler converts centimetres or inches to stitches and rows. When we say a tension square of 10 cm equals 27 stitches and 39 rows, we are actually converting the measurement of the knitting to either stitches or rows.

Therefore, if a piece of knitting measuring 10 cm equals 20 stitches, then 1 cm equals 2 stitches.
So, if 10 cm = 20 sts
then 1 cm = 2 sts
and
100 cm = 200 sts
50 cm = 100 sts

This can be converted into a formula. Thus, when you measure 10 cm how many stitches does that give you? e.g. 28 stitches equals 10 cm. Now, say you want to knit a sweater which is 50 cm wide.
So, if 10 cm = 28 sts
then 50 cm = (28 sts x 50 cm)/10 cm = 140 sts.

So, you would cast on 140 stitches.
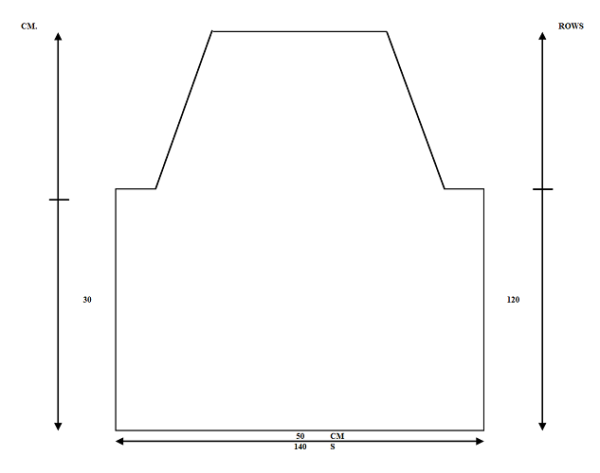
Sweater Example

Similarly, you want to work out the number of rows to knit up the back of the sweater to the armholes. Say this measures 30 cm. Your tension square gives you 40 rows to 10 cm.
So, if 10 cm = 40 rows
then 30 cm = (40 rows x 30 cm)/10 cm = 120 rows.

So, you would knit 120 rows.

Now, going back to our example, this gives us the formula:

(a x b)/c = d

where

a = the number of stitches or rows in a tension square
b = the number of centimetres or inches to be converted to stitches or rows
c = the number of centimetres or inches in a tension square (usually 10 cm or 4 inches)
d = the number of stitches or rows to be knitted

So, this is the ‘magic’ formula.

See, that wasn’t difficult was it? Just in case you are not sure, I have produced a diagram for this sweater working on a tension of 28 sts and 40 rows to 10 cm.

The Green Ruler Formula

So, how does this formula relate to the green ruler? Assume we will knit a tension square of 40 stitches and 60 rows and then measure these stitches and rows with the green ruler.

The green ruler formula is as follows

(a x b)/c = d

where

a = the number of stitches or rows in a tension square (in this example we will say 40 stitches or 60 rows)
b = the number of centimetres or inches in a tension square (usually 10 cm or 4 inches)
c = the length of the tension square (i.e. a variable value since every tension square will be a different size)
d = the number of stitches or rows as shown on the green ruler

Let us look at an example.

Knit a 60 row tension square and measure it.
The measurement is 10 cm or 60 rows.

(60 x 10)/10 = 60 rows

So, 20 cm is 30 rows.

(60 x 10)/20 = 30 rows

and 30 cm is 20 rows.

(60 x 10)/30 = 20 rows

that is:

(60 x 10)/variable = the number of rows required.

As you can see the formula for the green ruler is similar to the formula for converting centimetres to stitches or rows.

Using a Computer

It is possible to use a computer to help with your knitting in many ways. What you must be able to do is translate what you do (sometimes almost by instinct) into a recognisable mathematical formula. We have just done that by converting the use of the green ruler into a formula. Once you have a list of these formulas (or is it formulae!) it is a relatively simple matter to translate this (either yourself or by bribing a friendly computer buff) into computer language. Then the computer gets on with the tedious arithmetic whilst you go play with your knitting machine. I hope you have fun thinking about why you do things in knitting as well as how you do them.
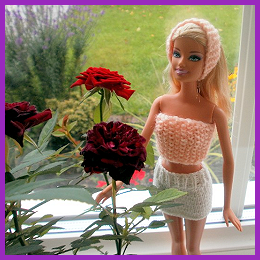
Free Pattern – Barbie in Pink

Published July 24, 2016 by estherknit

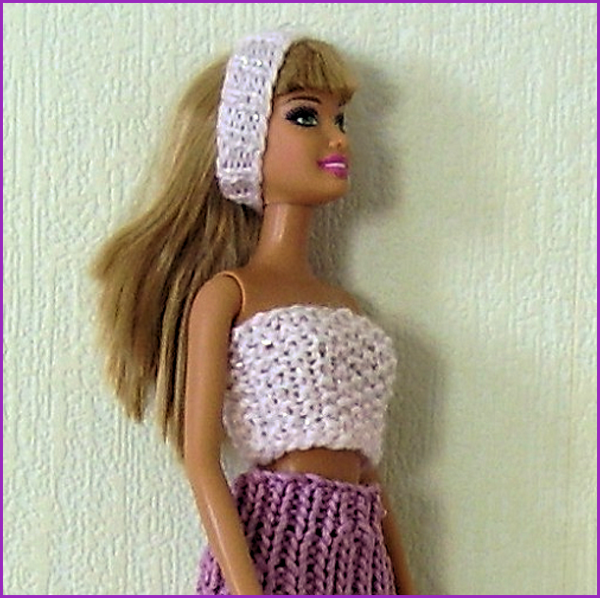
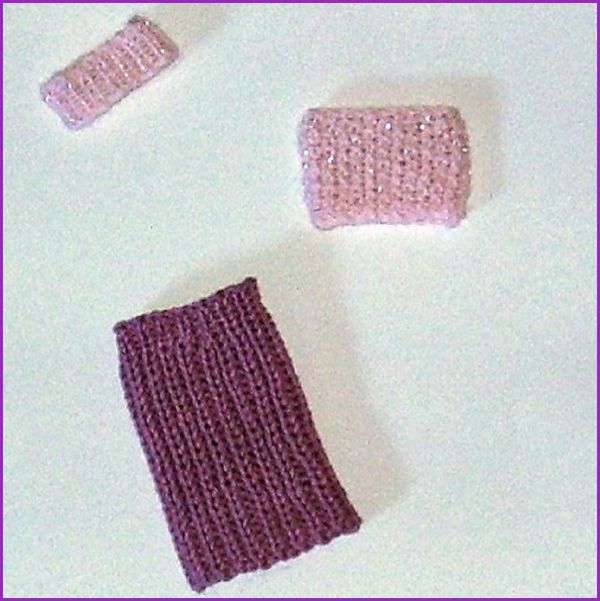
Barbie in Pink 7

Skirt

Measurements

To fit Barbie doll

29 cm (11½ inch) fashion doll

Length of skirt: 10 cm (4 inches)

Materials

4 ply yarn

A pair of 2 mm (US 0) knitting needles

Tension / Gauge

28 sts and 40 rows to 10 cm (4 inches)

measured over st.st. using 2 mm needles.

36 sts and 40 rows to 10 cm (4 inches)

measured over k1, p1 rib using 2 mm needles

To knit skirt

Using 2 mm (US 0) needles, cast on 39 sts.

1st row: K1, * p1, k1, repeat from * to end.

2nd row: P1, * k1, p1, repeat from * to end.

Continue in rib pattern as set until work measures 10 cm, 4 inches.

Cast off in rib.

To make up / Finishing

Sew back seam.  Weave in ends.

Tube Top

To fit Barbie doll

29 cm (11½ inch) fashion doll

Length: 5 cm (2 inches)

Materials

4 ply yarn, 100g

A pair of 2 mm (US 0) knitting needles

Tension / Gauge

19 sts and 36 rows to 10 cm (4 inches)

measured over moss stitch using 2 mm needles

To knit tube top

Using size 2 mm (US 0)  needles, cast on 24 sts.

Work in moss stitch as follows:

1st row: K1, * p1, k1; repeat from * to last st., p1.

2nd row: P1, * k1, p1; repeat from * to last st., k1.

Repeat these 2 rows 8 times more. (18 rows)

Cast off loosely in pattern.

To make up / Finishing

Join back seam. Weave in ends.

Headband

Measurements

To fit Barbie doll

29 cm (11½ inch) fashion doll

Head circumference: 11 cm (4½ inches)

Width of headband: 1.5 cm (½ inch)

Materials

4 ply yarn

A pair of 2 mm (US 0) knitting needles.

Tension / Gauge

28 sts and 40 rows to 10 cm (4 inches)

measured over st.st. using 2 mm needles.

To knit headband

Using 2 mm (US 0) needles, cast on 30 sts.

Work 6 rows in k1, p1, rib.

Cast off loosely.

To make up / Finishing

Sew seam. Weave in ends.

Barbie in Pink 6

Introduction to Crochet

Published July 23, 2016 by estherknit

Why Learn to Crochet?

Crochet has the great advantage of being very portable, money saving and an immensely satisfying pastime.  With a simple hook and yarn you can create fashion items for you and your family or furnishings for your home.  Crochet is one of the most versatile and exciting skills to learn.  Once you have mastered the basic stitches, it is an easy skill to develop and very quick to work.

Aviary Photo_131137592693967322

The History of Crochet

The craft of crochet as we know it today has been worked for around four hundred years.  The name ‘crochet’ is believed to be derived from the French word ‘croche’ meaning hook.

Crochet is a mainly European craft that was known in Italy before the sixteenth century simply as an alternative method of making lace.  It developed from tambouring (the craft of working chain stitch over a tightly stretched fabric).  For many centuries it was worked almost exclusively by nuns for church vestments and cloths, thus becoming commonly known as ‘Nun’s work’ or ‘Nuns lace’.

After a while nuns began teaching the craft to daughters of upper class families as part of their ‘finishing course’ as it was considered a suitable occupation for genteel young ladies.   Gradually crochet spread across Spain and France, eventually being brought to Britain by refugees from the French Revolution.  In the mid-nineteenth century crochet became the main source of income for many Irish families during the potato famines.

Madame Eleanore Reigo De La Branchadiere, a Franco/Spanish lady, taught the craft to members of the royal family, and it was she who first collected and devised a system of written instructions for crochet patterns.  These were published in a monthly magazine called ‘The Needle’, which she edited from 1852 to 1854.  Before then all patterns had been passed on by example.

By the beginning of the twentieth century fashions had again changed and laces in any form were no longer in demand.  For almost 50 years there was very little interest in the craft, and it is largely due to the efforts of Mime de La Branchardiere and others that a great deal of detailed knowledge of the craft was retained.

Since the 1960s, crochet has again become a fashionable craft, this time however turning away from fine traditional lace work and being use to produce complete fabrics in today’s modern yarns.  It has also developed into an art form in its own right and is used for 3-dimentional sculptures, jewellery, wall hangings and so on.

There is also evidence that sailors and shepherds in medieval Europe fashioned rough fabrics from hand-spun wool.  The hooks they used were made of bone or wood and were probably similar to the Tunisian hooks used in the Middle East since pre-Christian times.  Tunisian crochet is a cross between knitting and crochet in which a very long hook is used for working the fabric.

Today’s hooks are based on the old tambour hook, which was narrow at the hook and wide at the top end.  These were made of wood, bone, tortoiseshell and ivory.   Unlike the tambour hook however, today’s hooks remain the same thickness the whole length of the hook, and come in three types.  Fine steel hooks are used for delicate lace-work, thicker metal hooks are used for modern knitting type yarns, and long tunisian hooks of metal.  Each range comes in graduating sizes.

Crochet Hooks

Crochet hooks are made in a range of sizes from a 0.60 used for fine lace crochet, to a 16.00 used in conjunction with very thick yarns.  The size is the metric measurement taken round the body of the shaft.  All manufacturers conform to this method of sizing, known as the International Size Range (ISR).

Crochet Hook Conversion Chart 1

The size of crochet hook will be detailed using one or more sizing definitions. Modern crochet hooks are measured in metric measurements, starting at 2 mm and going up to sizes greater than 15 mm. Some old crochet hooks, however, use a different sizing convention and these were measured in numbers. The higher the number the smaller the hook.

Abbreviations

To make the reading of crochet patterns more straightforward, the names of crochet stitches are often abbreviated. Instead of repeating ‘chain stitch’ for instance, the abbreviation ‘ch’ is used. This is helpful and makes patterns easier to follow. Most crochet patterns and books contain a glossary of terms used including any special or unusual abbreviations.

Blocking

Most crocheted items benefit from being blocked and this is particularly true of lace items. Blocking a finished piece of crochet entails gently wetting the item and then pulling it to shape on a flat surface. The item may need to be pinned to stop it from springing out of shape. A crochet pattern will give any special instructions required for blocking.

Flat or in-the-round

Crochet is either worked flat or in the round. Crochet that is worked flat is worked in rows with the work turned at the end of each row. Crochet that is worked in the round is worked in a constant round without turning the work. Both types of crochet have their own benefits. Crochet that is worked flat is ideal for traditional garment construction. Crochet that is worked in the round starts at a central point and is worked outwards, making it ideal for large items.

Crochet Symbols

Some crochet patterns, particularly motif and lace crochet, are presented using crochet symbols. Each stitch has a unique symbol and this is used to show how a design is created. Many patterns that feature symbols also have a written version. Symbol crochet is useful as it transcends language making a project open to crocheters the world over.

Crochet Terms

Crochet has a language all of it’s own.  When you learn to crochet the first thing you will have to do is become familiar with crochet terms such as single crochet and double treble.

Tension or Gauge

Crochet gauge is very important. This measures the number of stitches and rows to 10 cm. Checking crochet gauge is necessary when making an item that needs to be a set size. If there are too many stitches and rows then the item will be too small and a larger hook should be used. Most crochet patterns will give a stated gauge and before starting the pattern, a test square should be worked to check gauge.

Yarns

Yarn and wools are grouped together according to thickness. This means that all yarns that are double knitting weight will be the same thickness regardless of brand or manufacturer. This standardisation of yarns is a useful way to ensure that yarns can be substituted in crochet patterns without altering the finished dimensions of a project.

Motif Crochet

Motif crochet is the creation of small single crochet blocks that are then stitched together to form bigger items. These are typified by the granny square, however motifs can be highly intricate and delicate designs as well as more basic and bulky versions.

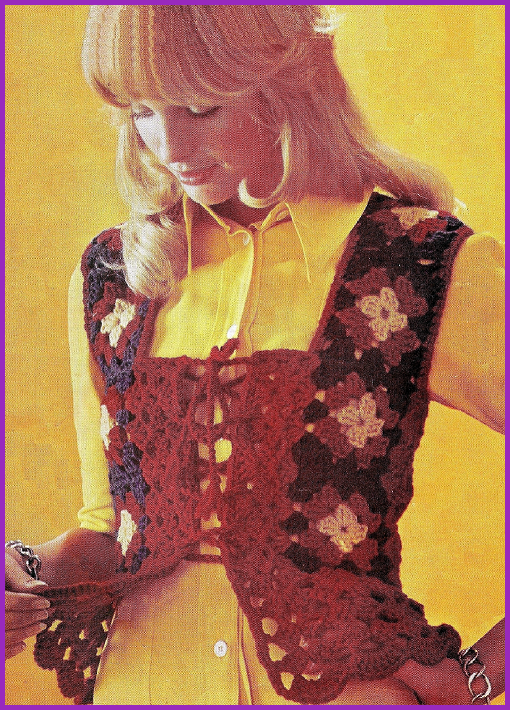
Crochet Motif Waistcoat


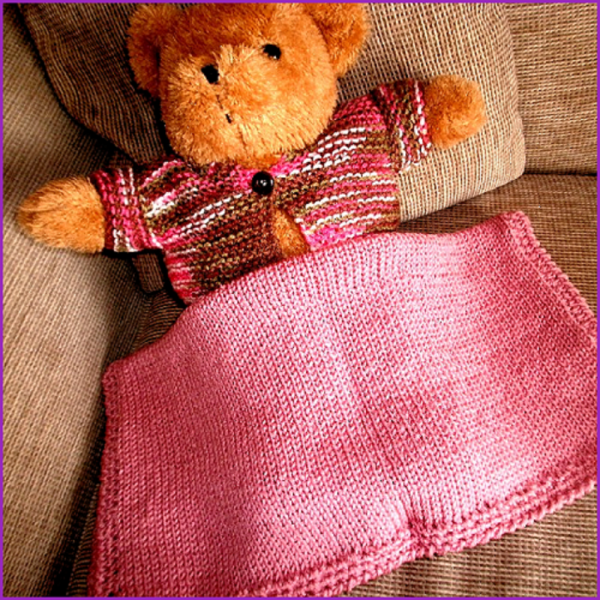
Free Pattern – Blanket for Teddy

Published July 22, 2016 by estherknit

Blanket for Teddy 7

Measurements

43 cm (17 inches) square

Materials

Bundle of Joy Baby DK, 50 g

Shade: White 100 g

A pair of 4 mm (US 6) knitting needles

A 4 mm crochet hook

Tension / Gauge

22 sts and approx 28 rows to 10 cm (4 inches)

measured over st.st. on 4 mm needles

To knit blanket

Using 4 mm (US 6) needles, cast on 96 sts.

Continue in stocking stitch until piece measures 43 cm from beg, (approx. 120 rows) ending after a WS row.

Cast off.

Crochet Border

Using 4 mm crochet hook, crochet around edge as follows.

1st round: sc around.

2nd round: sc around.

3rd round: crab stitch around.

 To make up / Finishing

Weave in ends.  Pin out to size, cover with a damp cloth, and leave to dry.

Blanket for Teddy 6


Conversion Charts

Published July 19, 2016 by estherknit

Conversion charts give the relationship of one thing to another.  They can be very useful and you can chart all sorts of things.  You can chart –

  • inches to centimetres
  • centimetres to inches
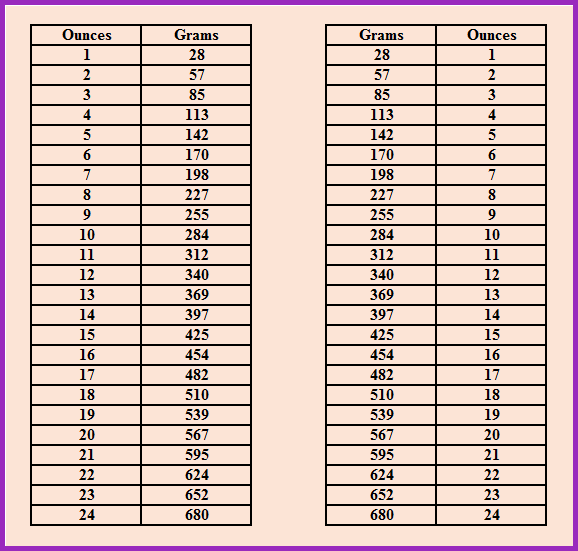
  • ounces to grams
  • grams to ounces
  • ball weights
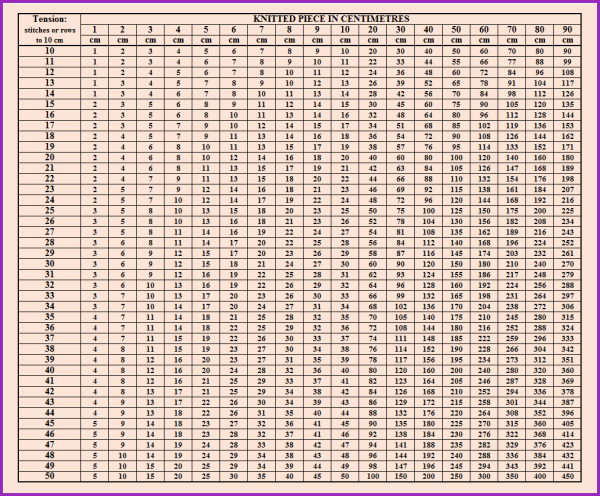
  • stitches and rows to centimetres
  • types of crochet hooks
  • types of knitting needles

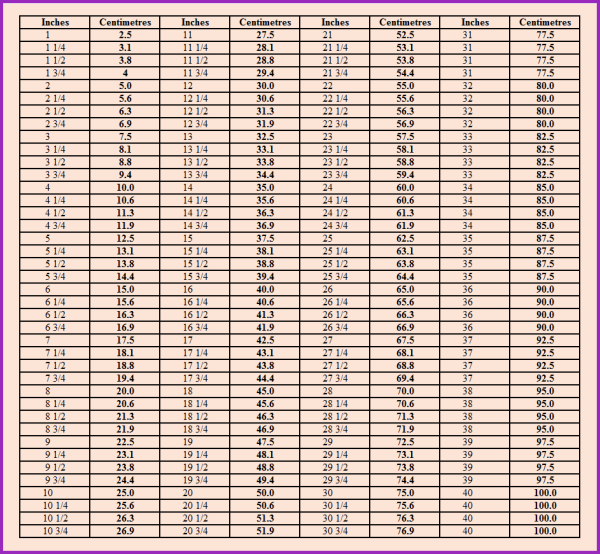
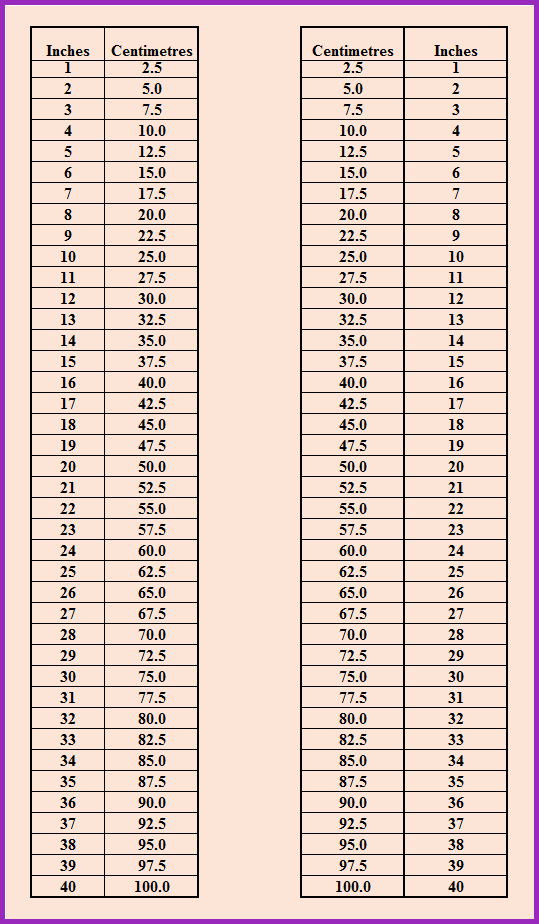
This is a metric conversion chart.  It converts inches to centimetres.

Metric Conversion Chart 1

This is a metric conversion chart for ball weights.  It converts ounces to grams for different balls of yarn.

Ounces To Grams Chart 1

This is an ounces conversion chart.  It converts ounces to grams.

Ounces to Grams Chart 1

This is a chart to convert stitches or rows to centimetres using a tension square.  For example, using the chart, if your tension square has 22 stitches, then to knit a piece size 40 cm, you will need 88 stitches.  If your tension square has 28 rows, then to knit a piece size 40 cm, you will need 112 rows.   So, if your tension square is 22 stitches and 28 rows to 10 cm, then to create a knitted piece of 40 cm square, you will cast on 88 stitches, and knit 112 rows.

Stitches and Rows Chart 1This is a chart giving different types of crochet hook and their relationship to each other.
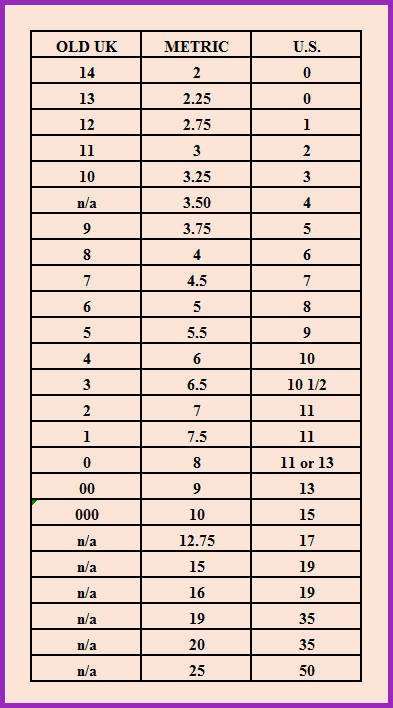
Crochet Hook Conversion Chart 1

This is a chart giving different types of knitting needles and their relationship to each other.
Knitting Needle Conversion Chart 1

This is another version of the metric conversion chart.

Metric Conversion Chart 2


If you would like a copy of any of these charts as a PDF, then email me.  Mark your email ‘PDF Conversion Charts’.

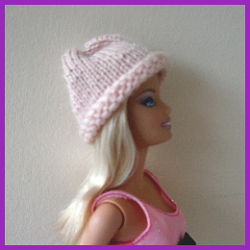
Free Pattern – Beanie for Barbie

Published July 15, 2016 by estherknit

Beanie for Barbie 2

Measurements

To fit Barbie doll

29 cm (11½ inch) fashion doll

Width Round Head: 12 cm (5 inches)

Length: 5 cm (2 inches)

Materials

Wendy Mode 4 ply

Shade: 204 Peach

Pair of 2 mm (US 0) knitting needles

Tension / Gauge

30 sts and 44 rows to 10 cm (4 inches)

measured over st.st. using 2 mm needles

To knit beanie

Using 2 mm (US 0) needles, cast on 36 sts.

Continue in st.st. until work measures 5 cm (2 inches).

Pull thread through the remaining stitches.

To make up/ Finishing

Sew seam, reversing seam at turnup.

Weave in ends. Allow brim to roll.

Beanie for Barbie 6

How to Knit for Barbie and Ken

Published July 11, 2016 by estherknit

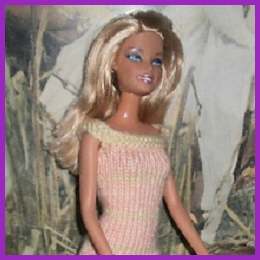
Barbie is a fashion doll manufactured by the American toy company Mattel Inc. and launched in March 1959. She has been an important part of the toy fashion doll market for over fifty years.  She is a 29 cm (11½ in.) fashionista doll. This is 1/8th scale. (As I understand it, she has about a 5 inch chest; multiply 5 by 8 and you get a 40 inch chest) If you knitted in 1/12th scale this would fit a doll in a dolls house. Some people even knit 1/24th scare. So, knitting for Barbie is a form of miniature knitting.

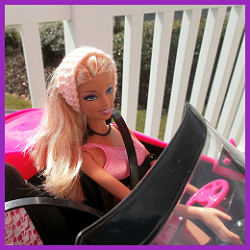
Barbie Doll in Pink Dress

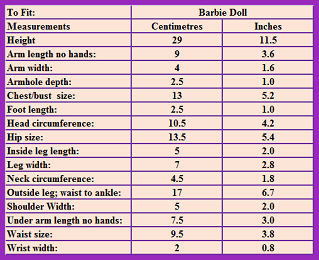
My Barbie doll’s measurements are:

Barbie Doll Size

Ken Carson is the fictional boyfriend of Barbie.  Ken and Barbie met on the set of a TV commercial in 1961.  Mattel has never specified the precise nature of their relationship.

Barbie and Ken

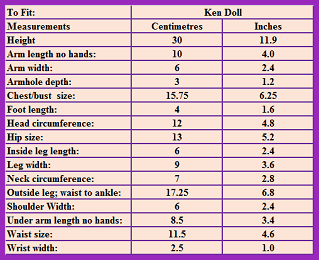
My Ken doll’s measurements are:

Ken Doll Size

Techniques

Knitting for Barbie requires a few specialist skills.

  • using small needles; 1 – 3 mm knitting needles
  • using fine yarn – 1 – 4 ply yarn
  • very fine sewing up and finishing off
  • finding tiny buttons and embellishments
  • photography

Finding Inspiration

There are lots of patterns, books and websites to inspire you to knit for Barbie.

Finding the right yarn

Barbie clothes are best knitted with fine yarns, such as 4 ply fingering, sock yarn, or cotton thread.  You will only use a very small quantity of yarn for your Barbie clothes and so you can use some expensive yarns.  Try using lurex, angora, cashmere, or other luxury yarns.

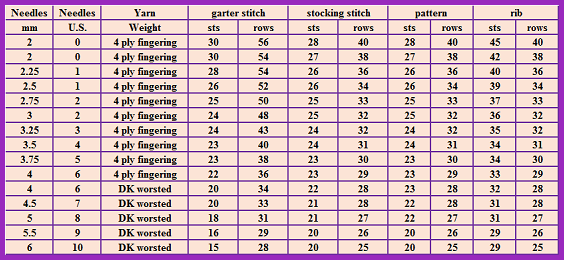
Tension or Gauge

When you knit for your Barbie doll, keep a record of the tension or gauge for each project. This will help you with future projects.

Barbie and Ken Tension Table for Blog

Taking pictures of Barbie

It is quite challenging to take pictures of Barbie. You need:

  • a good camera – otherwise Barbie will be rather fuzzy
  • a steady hand; try putting your camera onto a tripod or stand
  • good lighting
  • to understand perspective
  • a good eye for detail
  • a stand for Barbie.

Fair Isle Stitch Patterns

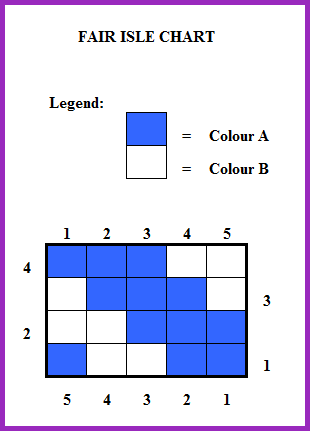
It is possible to knit outfits in Fair Isle for Barbie. However, the patterns need to be scaled down. Try making up your own patterns.

Barbie Chart

Hints and Tips

  • Make sure you are working with a good strong light. You are knitting a very small garment and you will need to see well.
  • Try not to knit with black as it will be even more difficult to see what you are doing.
  • There are many types of needles; wooden, metal, plastic – and simple metal wires for miniature knitting. If you can’t get on with one type you may find it worthwhile changing needle type rather than giving up completely.
  • Leave enough yarn at the beginning and end of each piece to sew up the seams.
  • Cast on slowly keeping your tension as even as possible. A good technique to use when casting on is to insert the needle into position for the next cast on stitch before pulling the thread ready to make the stitch.
  • Cast off steadily making sure that you do not work too tightly, especially
    around cuffs and necks.
  • Slip the first stitch and knit the last stitch of every row even if the
    pattern says otherwise. This will help you line up the seams when sewing up.
  • Keep your tension even.
  • When sewing up, use the yarn that you left at the beginning and end of each
    piece to over-sew all the seams. If you used the trick of slipping the
    first stitch and knitting the last, you will have a series of knots that
    can be used to line up the separate pieces.
  • If buttons are needed, use the thread left at the end of the button band to
    sew them into place, running the thread along the band to reach the
    position of the next button.
  • When you have sew up the garment, pin out to shape, cover with a damp cloth
    and allow to dry. Then add embellishments.
  • Always take good notes. You may be asked to knit it again!
  • You could even start a story board or a scrap book with lots of ideas so that you will always have some inspiration.

Embellishments

You may need buttons or ribbon for your Barbie outfits. These are available but I doubt you will find them in the High Street Shops. Find a website which deals in miniature knitting and I am sure they will have what you want.

A Simple Pattern for Barbie

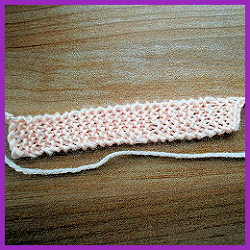
Before launching in the knitting a whole outfit for Barbie, it would be good to try something very simple. This way you can get used to knitting with very small needles and thin yarn. Here is a pattern for a garter stitch headband.

Headband 3

Measurements: To fit Barbie doll
Head circumference: 10.5 cm (4¼ inches)
Width of headband: 2 cm (3/4 inch)
Materials: Wendy Bambino 4 ply
Shade: 1455 Peach, 20 g
A pair of 2 mm (US 0) knitting needles
Tension / Gauge: 30 sts and 54 rows to 10 cm. (4 inches)
measured over garter stitch using 2 mm needles

To knit Headband:

Using 2 mm (US 0) needles, cast on 6 sts.
Work in garter stitch, every row knit, until headband measures 10.5 cm  or 4¼ inches. Cast off loosely.

Headband 1
To make up / Finishing:  Sew headband seam. Weave in ends.

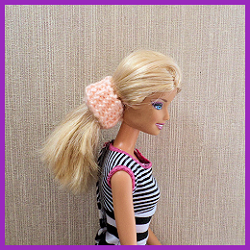
This headband can be folded to create a hair scrunchie.

Scrunchie 2

Make it a bit longer and you have a scarf.  Make it wider and you have a blanket or towel. There are lots of possibilities. There will be no stopping you now.

Headband 5

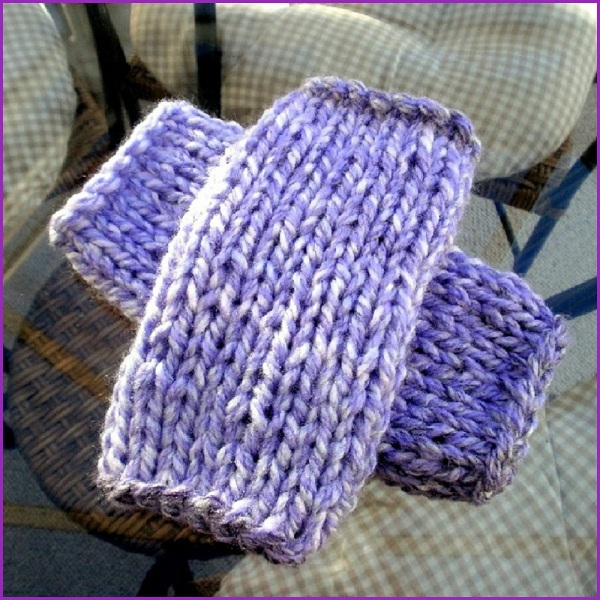
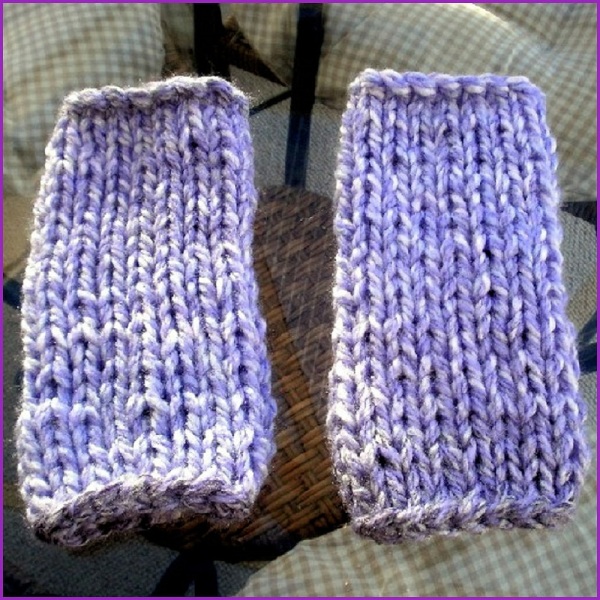
Free Pattern – Picasso Wristers

Published July 10, 2016 by estherknit

Picasso Wristers 6

Measurements

Width round palm: 16 cm (6½ inches)

Length: 17 cm (6¾ inches)

Materials

Robin Picasso Chunky

Shade: 2875 Parma Violet. 100 g

yarn is used double throughout

A pair of 12 mm (US 17) knitting needles

Tension / Gauge

8 sts and 10 rows to 10 cm (4 inches)

measured over st.st. using 12 mm needles.

To knit wristers

Using 12 mm (US 17) needles, and yarn used double throughout, cast on 13 sts.

Work in stocking st until piece measures 17 cm (6¾ inches).  Cast off.

To make up / Finishing

Sew seam. Weave in ends.

Picasso Wristers 7

How to Crochet the Granny Stitch

Published July 9, 2016 by estherknit

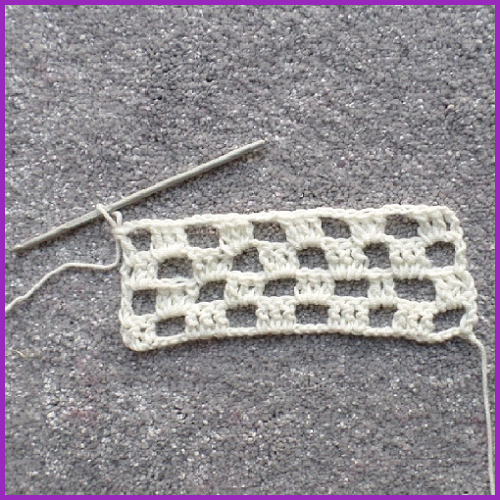
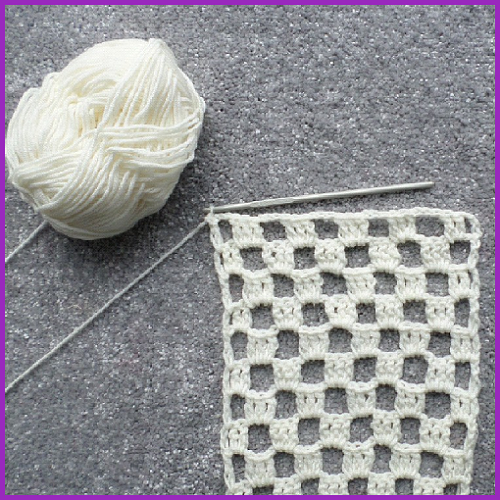
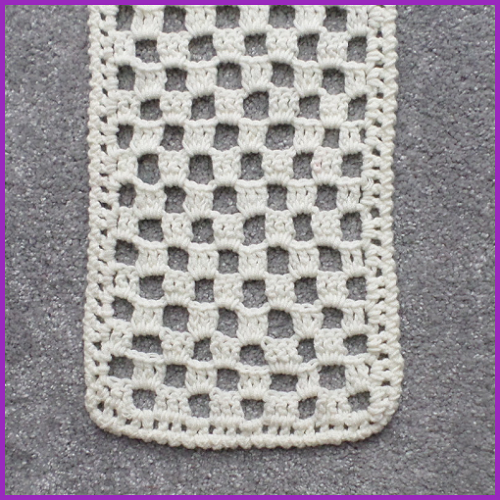
The crochet granny stitch is a very popular stitch and has many names and variations.  It is a filet and mesh stitch called Granny Rectangle Stitch, Filet Boxes Stitch, Chequerboard Stitch, or Open Checker Stitch.  It can be worked in rows or in squares called granny squares.  It is worked in US double crochet (dc) (UK treble (tr)) and chain stitches.

How to work a US Double Crochet (dc) Stitch

This stitch has three turning chains.

Chain a number of stitches divisible by 6, plus 3.
Step 1
Wrap the yarn over the hook.
Step 2
Miss 3 chain (turning chain).
Insert hook into the 4th chain from hook.
Step 3
Wrap the yarn over the hook again.
Step 4
Draw the yarn through the chain only.
Now you should have three loops on your hook
Step 5
Wrap the yarn over the hook again.
Step 6
Draw the yarn through the first 2 loops on the hook only.
Step 7
Wrap the yarn over the hook again and draw the yarn through the last 2 loops on the hook.
One double crochet stitch is completed (plus the turning chain).

How to work the granny stitch pattern

There are two versions of this pattern.

Version 1

Pattern for Granny Stitch in US Double Crochet (dc)
Chain a number of stitches divisible by 6, plus 3.
1st row: Work 1 dc in 4th ch from hook, 1 dc in next ch, * ch 3, skip next 3 ch, 1 dc in each of next 3 ch; repeat from * ending 3 ch, skip 3 ch, 1 dc in last ch. Turn.
2nd row: Ch 3 (counts as 1 dc), 2 dc in first ch-3 space, * ch 3, skip 3 dc, 3 dc in next 3-ch space; repeat from * ending 3 ch, skip 2 dc, 1 dc in 3rd of 3-ch. Turn.
The 2nd row forms the pattern and is repeated.

Pattern for Granny Stitch in UK Treble Crochet (tr)
Chain a number of stitches divisible by 6, plus 3.
1st row: Work 1 tr in 4th ch from hook, 1 tr in next ch, * ch 3, skip next 3 ch, 1 tr in each of next 3 ch; repeat from * ending 3 ch, skip 3 ch, 1 tr in last ch. Turn.
2nd row: Ch 3 (counts as 1 tr), 2 tr in first ch-3 space, * ch 3, skip 3 tr, 3 tr in next 3-ch space; repeat from * ending 3 ch, skip 2 tr, 1 tr in 3rd of 3-ch. Turn.
The 2nd row forms the pattern and is repeated.

Version 2
There is another version of granny stitch. This pattern gives you three double crochet stitches at one side and 1 double crochet stitch at the other. With version 2, you can alter the pattern to make both ends the same – so you will have three double crochet stitches at each end of one row and 1 double crochet stitch at each end of the next row. This makes the pattern more even.

Scarf Pattern

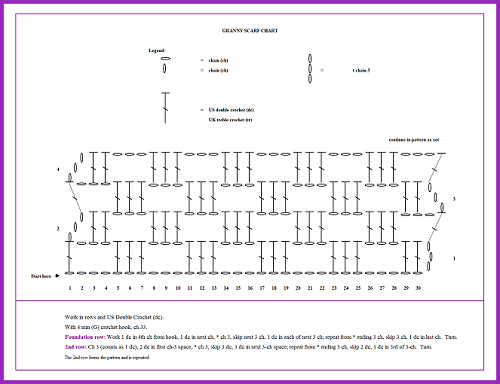
This stitch makes a lovely scarf.   Here is the chart.

Granny Scarf Chart

You will need 150 g of double knitting yarn. With 4 mm (G) crochet hook, ch 33.  Turn.

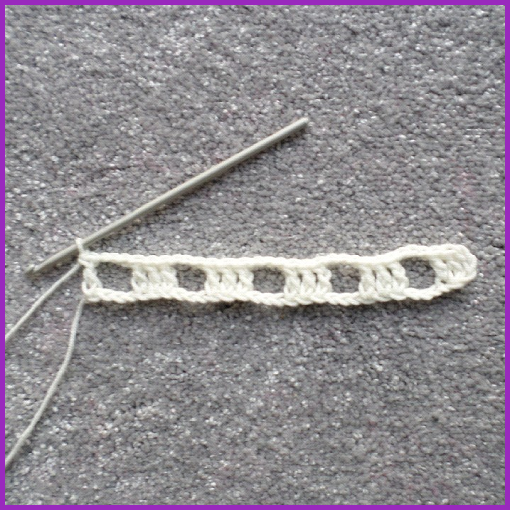
Granny Stitch 1

Foundation row: Work 1 dc in 4th ch from hook, 1 dc in next ch, * ch 3, skip next 3 ch, 1 dc in each of next 3 ch; repeat from * ending 3 ch, skip 3 ch, 1 dc in last ch.  30 sts.Turn.

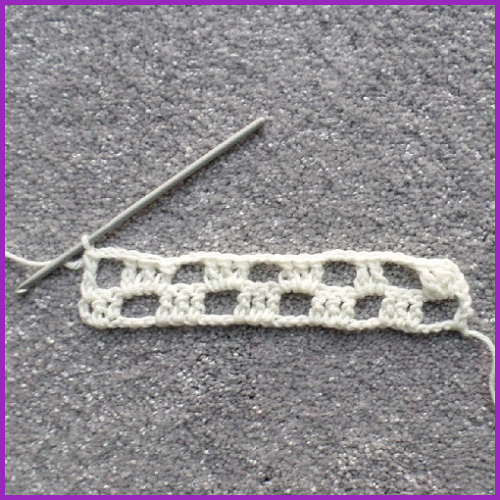
Granny Stitch 2

2nd row: Ch 3 (counts as 1 dc), 2 dc in first ch-3 space, * ch 3, skip 3 dc, 3 dc in next 3-ch space; repeat from * ending 3 ch, skip 2 dc, 1 dc in 3rd of 3-ch.  Turn.

Granny Stitch 3

Repeat 2nd row until scarf measures 180 cm or 71½ inches.

Granny Stitch 4

Fasten off.

Granny Stitch 5

Edging

With 4 mm (G) crochet hook, work in rounds and US single crochet (sc).

Round 1: Join yarn to corner of scarf.  Work sc in each st around edge of scarf. Join with sl st in beg ch1.

Round 2: Work crab stitch (reverse sc) in each sc around edge of scarf.

Fasten off.   Weave in ends.